Create a news item or photo gallery (post)
There are two kinds of posts you can create:
- News articles
- Photo galleries
News articles
To create a news article, go to the Dashboard and select “Posts”, then “Add New” (pictured right).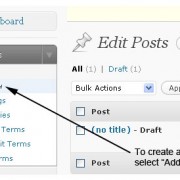
Give your News Article a title in the Title field.
On the right-hand side, check the “News” button in the “Categories” box.
Add your News Article text to the Visual Editor.
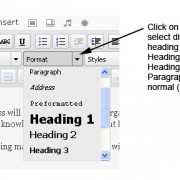
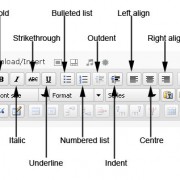 In the Visual Editor, you can create bulleted or numbered lists, change the alignment of your text, and bold, italicise or underline it (pictured left). You can also add headings to your content and more by first showing the Kitchen Sink. Then click on the Format dropdown menu and select the heading type – Heading 3, Heading 4, Heading 5 or Heading 6 – that you would like) (pictured below right).
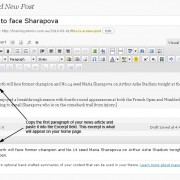
For an excerpt of your News Article to appear on the home page of your website, simply copy the first paragraph of your article and paste it in the “Excerpt” box (pictured left).
Next, in the Categories box on the right-hand side, check the “News” box.
Next, in the Post Tags field, add tags that describe your post. For example, “Easter Tournament”.
To add an image to your news article, you can either upload a new image or select a pre-uploaded image from your image library. For a guide on how to do this, go to the Upload an Image page.
Publish
Now that you’ve added text, a heading and uploaded an image, select “Publish” to publish the news article to your website.
Un-publish
Need to take a Post down for a short period of time? Simply open the Post and in the top-right corner of the page, go to Status and click on “Edit”. Select “Draft” then click on “OK”.
You can re-publish your Post at any time by opening the Post and selecting “Publish” in the right-hand column.
Delete a Post
In the Dashboard, select “Posts”. Find the post you would like to delete and hover your mouse over its title. A sub-menu will appear beneath the post’s title. From the sub-menu, select “Trash” to delete the post.
 Edit a post
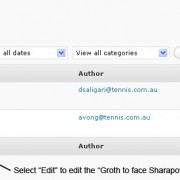
To edit a post, go to the Dashboard and select “Posts” to see a list of the posts on your website.
To edit one of your posts, simply click on the post you’d like to edit (pictured left).
Make your changes and click on ‘Update’ to save your changes.
Add a new image to a news article
On the right-hand side, click on the “Set Featured Image” link (pictured right).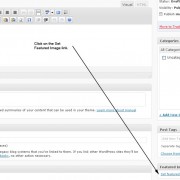
Next, click on the “Select Files” button (if you are using the Flash Uploader) or click on the “Browse” button if you are using the Browser Uploader.
Select the image you would like to use from your computer, then click on “Upload”.
Note: images can have a maximum width of 1024 pixels and should have a resolution of 72 dpi. For more information on images, read our Images and Graphics for the Web page.
A thumbnail of your image will appear along with the following fields (pictured right), which you need to fill out:
-
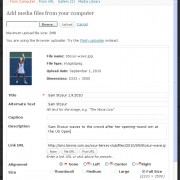 Title: the image title – this is the title of your image that will be displayed in the Media Library.
 - Alternate Text: this appears when you hover your mouse over an image. It is required by law to ensure that your website is accessible to people who are sight impaired.
- Description: the description is an image’s caption. This is the text that will accompany your image in photo galleries and news articles.
When you have finished filling out these fields, select the “Use as Featured Image” link at the bottom of this screen, then close the “Set Featured Image” box.
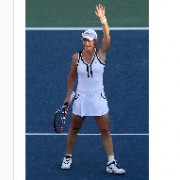 Your image should appear in the Post editor in the “Featured Image” box (pictured left).
To remove the uploaded image, select the “Remove Featured Image” link that appears underneath the image.
Select a pre-uploaded image
On the right-hand side, click on “Set Featured Image”.
Next, select Media Library from the menu at the top of the “Set Featured Image” box.
Here you can view your pre-uploaded images and perform searches for particular images.
To select an image, click “Show” to view the image’s details.
Click the “Use as Featured Image” link, then close the “Set Featured Image” box.
Your image should appear in the “Featured Image” box.
To remove the uploaded image, select the “Remove Featured Image” link that appears underneath the image.
Photo galleries
- Prepare all images and are cropped them to a maximum of 1024Wx768H for landscape shots and 768Wx1024H for portrait and make sure it’s 72 dpi.
- Create a new post and categorise it in “Photos”, fill in all the other stuff like tags, title etc.
- Click “Add/Upload Media” and batch upload all the images you’d prepared earlier.
- Once you have uploaded all the images, make sure you go to the Gallery Tab. Scroll down until you see the Gallery Settings, and make sure “Link thumbnails to” is set to “Image File” and under “Gallery columns” drop-down, change to “5”
- Click “Insert gallery” and publish the post.
This Chapter Create a news item or photo gallery (post)
Published in CMS Next Chapter Upload an image ↑ Top
